Testing SOAP custom service in your application by using SoapUI
SoapUI (https://www.soapui.org/) is a tool that is often used to interact with SOAP and REST web services in scenarios that involve API development and testing. This procedure isn't an endorsement of SoapUI, and other similar tools are available. However, we are using SoapUI to illustrate the concepts and messages that are involved when you use OAuth to authenticate with Azure AD, and then make SOAP requests to and receive responses.
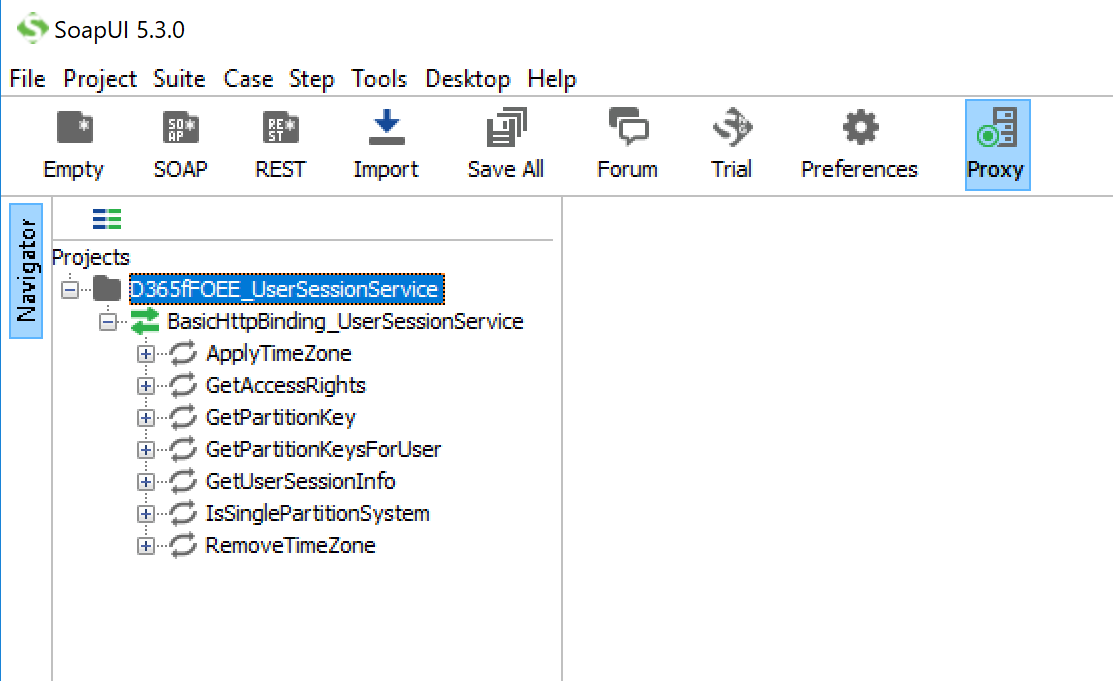
Start SoapUI, and select the SOAP button to create a project.
Complete the information for the project:
In the Project Name field, enter a name for the project.
In the Initial WSDL field, enter the service address, and add the suffix ?wsdl. (The service address should be in the format [Finance and Operations instance base URL]/soap/services/[service group name].) For more information, see the Services home page.
For example, we are querying the user session service at the URL
https://[Finance and Operations base URL]/soap/services/UserSessionService?wsdl.Select the Create sample requests for all operations? check box.
Because you selected to create sample requests, one sample request is created for each service operation that is available.

Right-click the new project, and then select New TestSuite to create a test suite. This test suite will generate a POST request for an Azure AD authorization token.
Right-click the test suite, and then select New TestCase.
Expand the test case, right-click Test Steps, select Add Step, and then select HTTP Request.
Enter a name for the request, and then select OK.
Enter a name for the test step. The endpoint that you should use for the POST request is
[https://login.microsoftonline.com/[tenant_id]/oauth2/token](https://login.microsoftonline.com/%5btenant_id%5d/oauth2/token).Use the plus sign (+) button next to Parameters to add the following values.
To make sure that the parameters are in the POST body, select Post QueryString, and then select Play. An access token should be returned in the response pane. The values will be most readable if you use the JSON response tab. Copy the access token so that you can use it in the authorization header of subsequent requests.
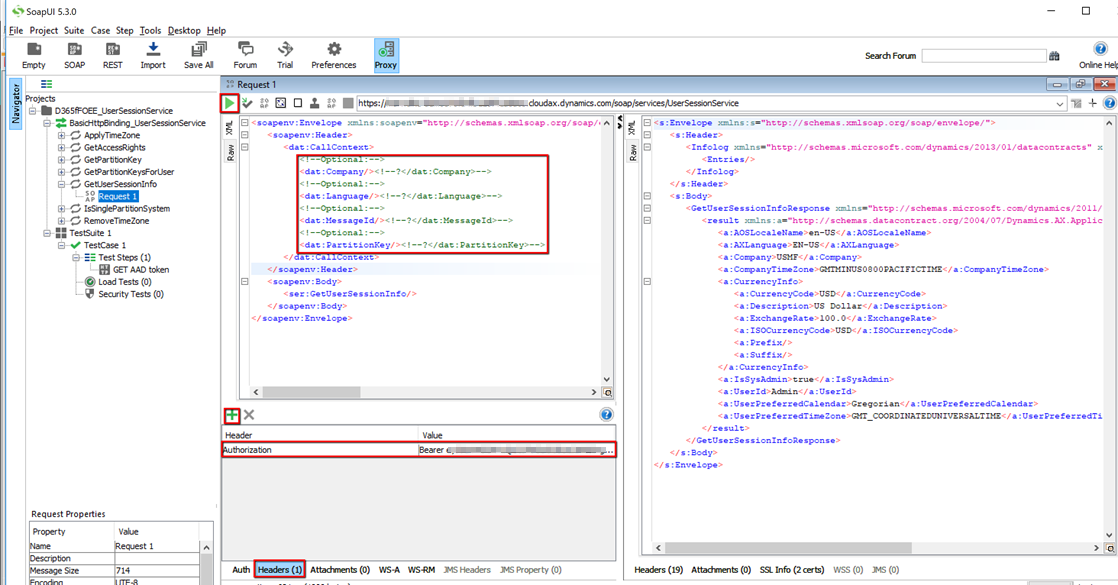
Go back to the first request node under the GetUserSessionInfo SOAP sample request. In the request pane on the left, select the plus sign (+) button to add a header that is named Authorization. Paste the access token into the Value field, and add the prefix Bearer.
The sample requests that SoapUI creates won't work unless you modify them. You must edit the call context and body so that they are consistent with the schema for what you're trying to do.
For our simple scenario, you can edit the optional call context elements so that they are null-valued. Insert a forward slash (/) before the greater than sign (>) in the opening tags. Then comment out the question marks (?) and the closing tags by using the standard <!--...--> syntax to delimit the start and end of the comments. (Question marks aren't valid content for the XML schema.) Alternatively, you can just delete the question marks (?) so that the context elements are empty.
The SOAP request is now ready. Select Play, and validate the result on the right.

In our example, we have now successfully authenticated and then queried UserSessionService via SOAP.
Above content is taken from https://docs.microsoft.com/
Thanks,
Vikas Mehta


Thank you for helping people get the information they need. Great stuff as usual. Keep up the great work!!!
ReplyDeleteDynamics 365 testing
Great post! Struggling to Define Qualified Lead? QLead AI simplifies the process by identifying high-intent prospects, boosting sales efficiency, and maximizing revenue. Its AI-driven approach ensures you target the right audience, making your lead generation efforts more effective and profitable. Visit us for more!
ReplyDeleteDefine Qualified Lead/a>