Bring your own database (BYOD)
This topic explains how administrators can export data entities from the application into their own Microsoft Azure SQL database. This feature is also known as bring your own database (BYOD). The BYOD feature was released in Microsoft Dynamics AX with platform update 2 (August 2016). Minor improvements and bug fixes have been included in subsequent platform updates.
The BYOD feature lets administrators configure their own database, and then export one or more data entities that are available in the application into the database. (Currently, more than 1,700 data entities are available.) Specifically, this feature lets you complete these tasks:
- Define one or more SQL databases that you can export entity data into.
- Export either all the records (full push) or only the records that have changed or been deleted (incremental push).
- Use the rich scheduling capabilities of the batch framework to enable periodic exports.
- Access the entity database by using Transact-SQL (T-SQL), and even extend the database by adding more tables.
Entity store or BYOD?
If you followed the series of blog posts about Microsoft Power BI integration, you will be familiar with Entity store. Entity store is the operational data warehouse. Entity store provides built-in integration of operational reports with Power BI. Ready-made reports and analytical workspaces use Entity store. If you write Power BI reports by using data in your application environment, you should use Entity store.
However, the BYOD feature is recommended for the following scenarios:
- You must export data into your own data warehouse.
- You use analytical tools other than Power BI, and those tools require T-SQL access to data.
- You must perform batch integration with other systems.
Note
The application doesn't allow T-SQL connections to the production database. If you're upgrading from a previous version of Finance and Operations, and you have integration solutions that require direct T-SQL access to the database, BYOD is the recommended upgrade path.
You can use either Entity store or BYOD. The default operational reports that are available take advantage of embedded Power BI and Entity store. We recommend that you use our default operational reports as your first choice. You can also extend the ready-made operational reports to meet your requirements. You should consider BYOD a complementary option that you use as you require.
Creating a SQL database
Before you can configure the entity export option and use the BYOD feature, you must create a SQL database by using Azure portal.
For one-box development environments, you can create a database in the local Microsoft SQL Server database. However, this database should be used only for development and testing purposes. For production environments, you must create an Azure SQL database.
You should also create a SQL user account for sign-in to the database. Write down the server name, database name, and the SQL user ID and password. You will use this information when you configure the entity export option in the next section.
If you're using the BYOD feature for integration with a business intelligence (BI) tool, you should consider using clustered columnstore indexes (CCIs). CCIs are in-memory indexes that improve the performance of read queries that are typical in analytical and reporting workloads.
Note
Your BYOD database must be accessible to Finance and Operations apps. If you encounter issues where you are unable access to access BYOD, you must ensure firewall rules in your BYOD are configured appropriately.
Configuring the entity export option
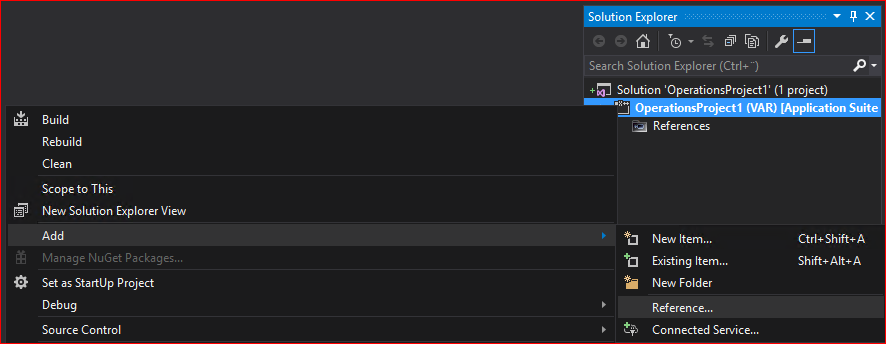
Start the client, and then, in the Data management workspace, select the Configure Entity export to database tile.
If you've configured any databases, a list is shown. Otherwise, you must configure a new database. In this case, select New, and then enter a unique name and a description for the new database. Note that you can export entities into multiple databases.
Enter the connection string in the following format:
Data Source=<logical server name>,1433; Initial Catalog=<your DB name>; Integrated Security=False; User ID=<SQL user ID>; Password=<password>
In this connection string, the logical server name should resemble nnnn.database.windows.net. You should be able to find the logical server name in Azure portal. The following illustration shows an example of a connection string.

Note
The default extension field shown in the image above does not apply to BYOD.
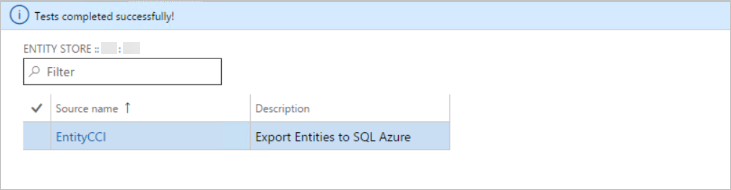
Select Validate, and make sure that the connection is successful.
- The Create clustered column store indexes option optimizes the destination database for selected queries by defining CCIs for entities that are copied. However, CCIs are currently supported only on SQL premium databases. Therefore, to enable this option, you must create a SQL premium database.
- The Enable triggers in target database option sets export jobs to enable SQL triggers in the target database. This option lets you hook downstream processes into the trigger to orchestrate actions that must be started after records have been inserted. One trigger is supported per bulk insert operation. The size of the bulk insert is determined by the Maximum insert commit size parameter in the Data management framework.
For scenarios in which reporting systems read data from BYOD, there is always the challenge of ensuring that the reporting systems get consistent data from BYOD while the sync is in progress. You can achieve this result by not having the reporting systems read directly from the staging tables created by the BYOD process. The staging tables hold the data while data is being synced from the instance and hence will be constantly changing. Use the SQL trigger feature to determine when the data sync has been completed, and then hydrate the downstream reporting systems.
When the validation is passed, the database that you configured for entity export appears in lists of databases, as shown in the following illustration.
You can now publish one or more entities to the new database by selecting the Publish option on the menu.
Publishing the entity schema to the database
The Publish page enables several scenarios:
- Publish new entities to the database.
- Delete previously published entities from the database. (For example, you might want to re-create the schema.)
- Compare published entities with the entity schema. (For example, if new fields are added later, you can compare the fields with your database schema.)
- Configure change tracking functionality that enables incremental updates of your data.
The following sections discuss each option.
Publish
The Publish option defines the entity database schema on the destination database. When you select one or more entities, and then select the Publish option, a batch job is started. This job creates the entities in the destination database. When the database definition job is completed, you receive a message, which you can access by using the bell symbol in the upper right.
The actual data update occurs when you export data. At this point, you're just creating the schema.
Drop entity
The Drop entity option deletes the data and the entity definition from the destination database.
Compare source names
The Compare source names option lets you compare the entity schema in the destination with the entity schema in the application. This option is used for version management. You can also use this option to remove any unwanted columns from the destination table.
Configure change tracking
Change tracking is a feature that is provided in SQL Server and SQL Database. Change tracking enables the database to track changes including deletes that are made on tables. The system uses change tracking to identify changes that are made to tables as transactions. However, because the application must track changes at the data entity level, there is additional logic on top of SQL change tracking to make this functionality work. The steps to enable change tracking are explained later in this section.
The Change tracking option on the Publish page lets you configure how changes are tracked on the underlying entity.

The following table describes the change tracking options that are available.
To use change tracking, you must enable the Change tracking option as shown above in data management. This action is available on the Data entities list page, by going to Data management > Data entities. You need to select an entity and select from one of the options listed above to enable change tracking on the data entity.
If you republish an entity that exists in the destination database, the system warns you that existing data will be deleted because of the new operation.
When you confirm the publish operation, the system publishes the schema to the database, and you're notified when the operation is completed.
By selecting the Show published only option on the Publish page, you can show only the entities that were published to a given destination database. The Publish function creates the entity schema in the database. You can navigate to the database and see the table schemas that were created, together with corresponding indexes.
Note
Currently, you can't use BYOD to export composite entities into a database. You must export each entity in the composite entity.
Exporting data into your database
After entities are published to the destination database, you can use the Export function in the Data management workspace to move data. The Export function lets you define a Data movement job that contains one or more entities.
You can use the Export page to export data into many target data formats, such as a comma-separated values (CSV) file. This page also supports SQL databases as another destination.
You can create a data project that has multiple entities. You can schedule this data project to run by using the batch framework. You also schedule the data export job to run on a periodic basis by selecting the Export in batch option.
The same job can also be used to export data from all companies. In prior to Platform update 27, this feature can be enabled by enabling the flight DMFEnableAllCompanyExport as explained in Data management overview. Starting in Platform update 27, this feature can be enabled in data management framework parameters. After the feature is enabled, a new option will appear when adding an entity to a data project. This option can be enabled to export data from all companies for the specific entity.
Note
Adding multiple entities to an export project for BYOD must be done carefully to ensure the overall reliability of the BYOD export is not compromised. Different parameters must be taken into consideration when deciding the number of entities that are added to the same project. Some of these parameters should be the degree of complexity of the entities, data volume per entity that is expected, and the overall time for export to complete at the job level. Adding hundreds of entities must be avoided, therefore creating multiple jobs with smaller number of entities is recommended.
Use of recurring exports in Manage > Manage recurring data jobs for BYOD is discouraged. You must use the Export in batch option.
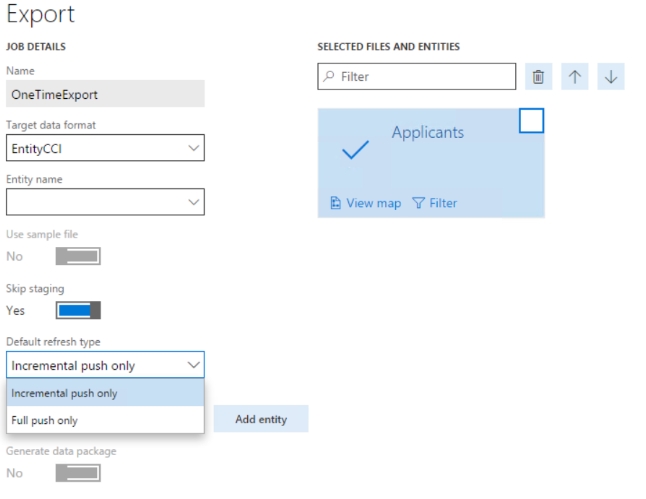
Incremental export
When you add an entity for data export, you can select to do an incremental export (which is also known as incremental push) or a full push. For incremental push to work, you must enable the Change tracking option in the database and specify an appropriate change tracking option, as described earlier in this topic.
Note
A full push deletes all existing records from an entity and then inserts the current set of records from the selected entity.
If you select an incremental push, the first push is always going to be a full push. This is because SQL needs to know which records have been 'tracked' in order to be able to track subsequent changes. Whenever a new record is inserted, or a record is added or deleted, the corresponding change will be reflected in the destination entity.
Because the first push is always a full push, we do not recommend that you do an explicit full push before you enable change tracking.
We recommend that you first enable change tracking and schedule a export job with incremental push. This will take care of the first full push and the subsequent incremental exports.
Timeouts
The default timeouts for BYOD exports are set to ten minutes for truncation operations and one hour for actual bulk insert operations. When volumes are high, these timeout settings may not be sufficient and must be updated. Starting with the release of Platform update 18, you can update the timeout settings by navigating to Data management > Framework parameters > Bring your own database. These timeouts are company specific and must be set separately for each company.
Known limitations
The BYOD feature has the following limitations.
There should be no active locks on your database during synchronization
Because BYOD is your own database, you must ensure that there are no active locks on your Azure SQL database when data is being synced. Having active locks on your database during synchronization can result in slow writes or even failure to export to your Azure SQL database.
You can't export composite entities into your own database
Currently, composite entities aren't supported. You must export individual entities that make up the composite entity. However, you can export both the entities in the same data project.
Entities that don't have unique keys can't be exported by using incremental push
You might face this limitation especially when you try to incrementally export records from a few ready-made entities. Because these entities were designed to enable the import of data, they don't have a unique key. However, you can enable change tracking only for entities that have a unique key. Therefore, there is a limitation on incremental push. One workaround is to extend the required entity and define a unique key.
Troubleshooting
Incremental push not working correctly
Issue - When a full push occurs for some entity then a large set of records can be seen in BYOD using a select statement. However, an incremental push results in only a few records in BYOD. It seems as if the incremental push deleted all the records and added only the changed records in BYOD.
Solution - In cases like this it is recommended to disable and re-enable change tracking for the entity in question. The state of the SQL change tracking tables might not be in the expected state. Also verify that there are no other incremental exports that cover the same tables (DMF, MR, Retail).
SSIS Error Code DTS_E_OLEDBERROR. An OLE DB error has occurred. Error code: 0x80004005
Issue - Export to BYOD fails with an SSIS exception shown below.
An OLE DB error has occurred. Error code: 0x80004005.

An OLE DB record is available. Source: "Microsoft SQL Server Native Client 11.0"  Hresult: 0x80004005  Description: "Communication link failure".

An OLE DB record is available. Source: "Microsoft SQL Server Native Client 11.0"  Hresult: 0x80004005  Description: "TCP Provider: An existing connection was forcibly closed by the remote host.

Failed to open a fastload rowset for <entityStaging>. Check that the object exists in the database.

OLE DB Destination failed the pre-execute phase and returned error code 0xC0202040.
Solution - This can occur if the connection policy on the Azure SQL BYOD server is set to Proxy. This must be changed to 'Redirect' as explained in SQL DB Connectivity Architecture
Above content is taken from https://docs.microsoft.com/
Thanks,
Vikas Mehta